细数 iOS 里的 Hook 方案

之前在实现 组件化分发生命周期 - AOP 方案 过程中用到了 Aspects 这个库,所以当时又仔细看了看源码,借鉴了些消息分发的写法。后来又为了性能考虑用 libffi 这个库替换了 Aspects 的实现 ,参考了 Stinger 这个库的实现。本质上都是在做 Hook 操作,加上最近看了些 fishhook 的原理,涉及了很多 Mach-O 等底层原理,所以打算把 iOS 里的一些 Hook 方案列一下,做个笔记总结,就是这篇文章的初衷了。

看了一段时间的底层原理就有些倦怠了,所以计划了一场组内分享驱动着看完了 fishhook 相关的知识。Demo 和 keynote 放在了 GitHub上,地址在这:https://github.com/gonghonglou/HookDemo

Preview

1、Method Swizzling
2、Message Forwarding
3、libffi
4、fishhook
5、静态库插桩

6、基于桥的全量方法 Hook 方案 TrampoLineHook
7、Dobby / Frida

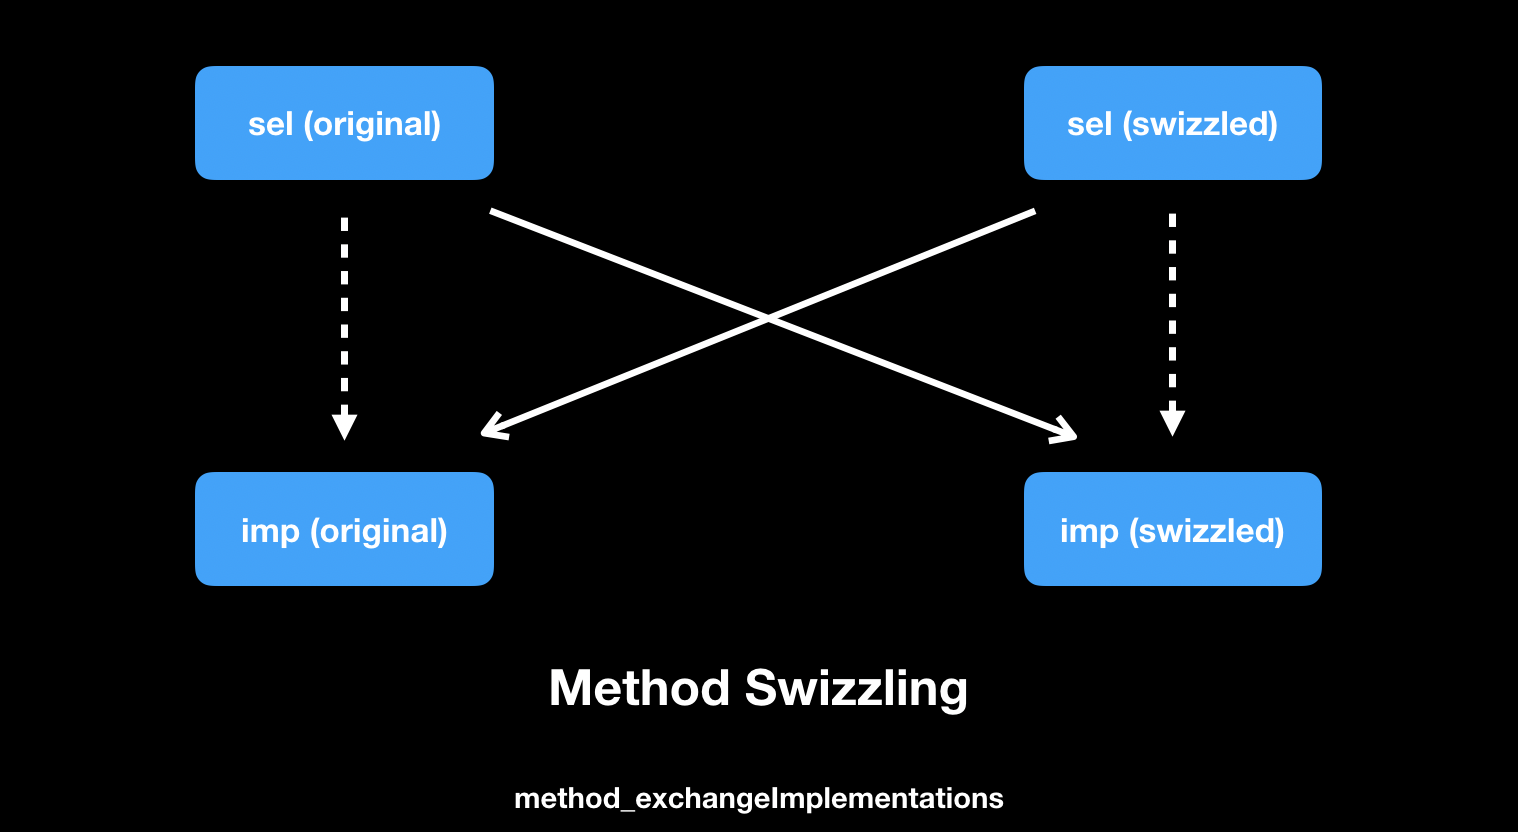
小试牛刀:Method Swizzling

这是 iOS 里最基础最原生的 Hook 方法了,当然也是性能最好的选择。本质上就是交换两个方法的 IMP(函数指针),即:

Method Swizzling

常见的写法也很简单:

1
2
3
4
5
6
7
8
9
10
11
12
13
14
15
16
17
18
19
20
21
22
23
24
25
26
27
@implementation HookDemoObj (HK)

+ (void)load {
static dispatch_once_t onceToken;
dispatch_once(&onceToken, ^{
Class class = [self class];

SEL originalSelector = @selector(loopLogWithCount:);
SEL swizzledSelector = @selector(hook_loopLogWithCount:);

Method originalMethod = class_getInstanceMethod(class, originalSelector);
Method swizzledMethod = class_getInstanceMethod(class, swizzledSelector);

BOOL success = class_addMethod(class, originalSelector, method_getImplementation(swizzledMethod), method_getTypeEncoding(swizzledMethod));
if (success) {
class_replaceMethod(class, swizzledSelector, method_getImplementation(originalMethod), method_getTypeEncoding(originalMethod));
} else {
method_exchangeImplementations(originalMethod, swizzledMethod);
}
});
}


- (void)hook_loopLogWithCount:(NSInteger)count {
[self hook_loopLogWithCount:count];
NSLog(@"hook after count: %d", count);
}

需要注意的也就是以下几点:

1、为什么 load 时机 可以成功执行?

1.1、启动 dyld(the dynamic link editor)将应用程序加载到二进制中
1.2、Runtime 向 dyld 中注册回调函数
1.3、通过 ImageLoader 将所有的 image 加载到内存中
1.4、dyld 在 image 发生改变时,主动调用回调函数
1.5、Runtime 接收到 dyld 的函数回调,开始 map_images、load_images等操作,并回调 +load 方法
1.6、调用 mian 函数

其中 3、4、5会执行多次,在 ImageLoader 加载新的 image 进内存后就会执行一次
ImageLoader 是 image 的加载器,image 可以理解为编译后的二进制

2、dispatch_once 保证,避免方法被多次交换。

3、调用原方法,因为方法已经被交换过了,所以这里调用 [self hook_loopLogWithCount:count]; 即执行的是原函数(originalIMP)。

穿针引线:Message Forwarding

主要是 Aspects 的原理,让目标方法在被执行时直接进入快速消息转发流程,在最后的 forwardInvocation: 方法里拿到 NSInvocation 对象,即包含了被调用方法的所有信息,主要是参数个数,参数值。然后在调用原方法之前或之后调用传入的 Block。

看一下 Aspects 的使用:

1
2
3
4
5
6
7
8
9
10
HookDemoObj *forwardingObj = [HookDemoObj new];
// 无参数的 block
[forwardingObj aspect_hookSelector:@selector(logString:) withOptions:AspectPositionAfter usingBlock: ^{
NSLog(@"Aspects after"); // Aspects after
} error:nil];
// 有参数的 block
[forwardingObj aspect_hookSelector:@selector(logString:) withOptions:AspectPositionAfter usingBlock: ^(id<AspectInfo> info, NSString *str){
NSLog(@"Aspects after: %@", str); // Aspects after: abc
} error:nil];
[forwardingObj logString:@"abc"];

需要注意的有以下几点:

1、isa-swizzling 的应用
2、消息转发流程。如何不重写 “methodSignatureForSelector:” 方法也能进入 “forwardInvocation:” 阶段?
3、如何获取 block NSMethodSignature?并且在不定参数情况下执行 block?

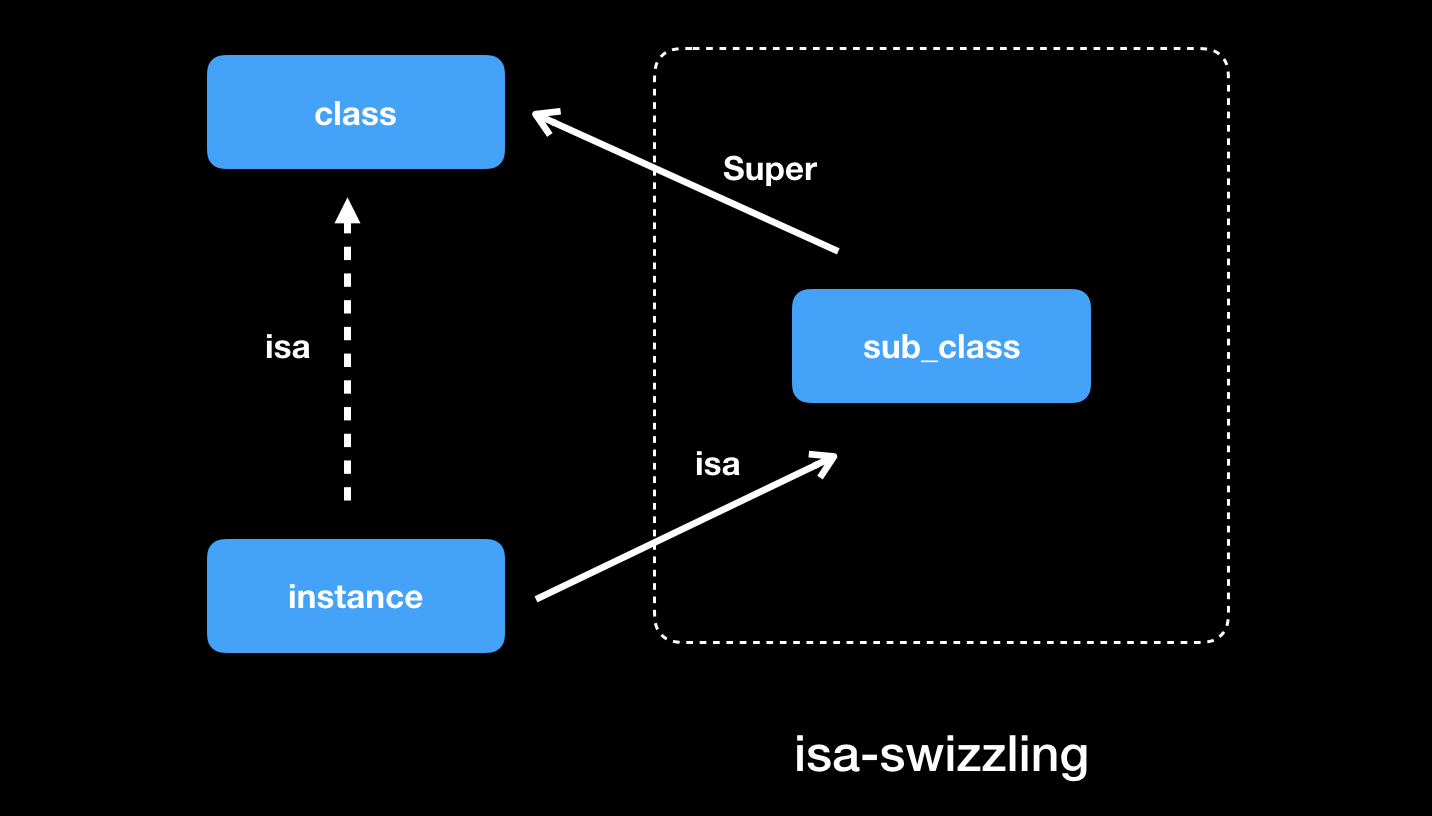
关于isa-swizzling 的应用:isa-swizzling 的原理如下图。即 KVO 的基本原理:原来的对象 isa 指向一个 class,通过 runtime 动态创建一个 class 的子类,并将原来对象的 isa 指向这个新建的子类,重写这个子类 getter、setter 即可。

isa-swizzling

Aspects 的应用:

1
2
3
4
5
6
7
8
9
10
11
12
13
14
15
16
17
18
19
20
21
22
23
24
25
// Default case. Create dynamic subclass.
const char *subclassName = [className stringByAppendingString:AspectsSubclassSuffix].UTF8String;
Class subclass = objc_getClass(subclassName);

// 判断目标类是否创建过
if (subclass == nil) {
// 动态创建子类
subclass = objc_allocateClassPair(baseClass, subclassName, 0);
if (subclass == nil) {
NSString *errrorDesc = [NSString stringWithFormat:@"objc_allocateClassPair failed to allocate class %s.", subclassName];
AspectError(AspectErrorFailedToAllocateClassPair, errrorDesc);
return nil;
}

// 交换 forwardInvocation: 方法
aspect_swizzleForwardInvocation(subclass);
// 重写 class 方法
aspect_hookedGetClass(subclass, statedClass);
aspect_hookedGetClass(object_getClass(subclass), statedClass);
// 注册动态创建的类
objc_registerClassPair(subclass);
}

// 修改 isa 指针指向新创建的子类
object_setClass(self, subclass);

关于消息转发流程:正常的消息转发流程如下:

1
2
3
4
5
6
7
8
9
10
11
12
13
14
15
16
17
18
19
+ (BOOL)resolveInstanceMethod:(SEL)sel {
NSLog(@"1:%@", NSStringFromSelector(_cmd));
return [super resolveInstanceMethod:sel];
}

- (id)forwardingTargetForSelector:(SEL)aSelector {
NSLog(@"2:%@", NSStringFromSelector(_cmd));
return [super forwardingTargetForSelector:aSelector];
}

- (NSMethodSignature *)methodSignatureForSelector:(SEL)aSelector {
NSLog(@"3:%@", NSStringFromSelector(_cmd));
return [super methodSignatureForSelector:aSelector];
}

- (void)forwardInvocation:(NSInvocation *)anInvocation {
NSLog(@"4:%@", NSStringFromSelector(_cmd));
[super forwardInvocation:anInvocation];
}

注意,必须实现 methodSignatureForSelector: 方法返回 NSMethodSignature 才会进入 forwardInvocation: 方法。但 Aspects 并没有实现 methodSignatureForSelector: 方法。Aspects 的做法是:把要 hook 的方法通过 class_replaceMethod() 接口指向 _objc_msgForward,这是一个全局 IMP,OC 调用方法不存在时都会转发到这个 IMP 上,直接把方法替换成这个 IMP,这样调用 hook 方法时就会走到 forwardInvocation:

1
2
3
Method targetMethod = class_getInstanceMethod(klass, selector);
const char *typeEncoding = method_getTypeEncoding(targetMethod);
class_replaceMethod(klass, selector, _objc_msgForward, typeEncoding);

关于 Block NSMethodSignature 和调用:

这里 Block_layout 是 Block 的源码,Block 的结构体内容是:

1
2
3
4
5
6
7
8
9
10
11
12
13
14
15
16
17
18
19
20
21
22
23
24
25
26
27
28
#define BLOCK_DESCRIPTOR_1 1
struct Block_descriptor_1 {
uintptr_t reserved;
uintptr_t size;
};

#define BLOCK_DESCRIPTOR_2 1
struct Block_descriptor_2 {
// requires BLOCK_HAS_COPY_DISPOSE
BlockCopyFunction copy;
BlockDisposeFunction dispose;
};

#define BLOCK_DESCRIPTOR_3 1
struct Block_descriptor_3 {
// requires BLOCK_HAS_SIGNATURE
const char *signature;
const char *layout; // contents depend on BLOCK_HAS_EXTENDED_LAYOUT
};

struct Block_layout {
void *isa;
volatile int32_t flags; // contains ref count
int32_t reserved;
BlockInvokeFunction invoke;
struct Block_descriptor_1 *descriptor;
// imported variables
};

isa 指向 Block 对象的类;
flags 决定 Block 包含的 Block_descriptor_1、Block_descriptor_2、Block_descriptor_3 信息;
reserved 预留字段

Aspects 获取 Block signature 的方式:

1
2
3
4
5
6
7
8
9
10
11
12
13
14
15
16
17
18
19
20
21
22
23
24
25
26
27
28
29
30
31
32
33
34
35
36
37
38
39
40
41
42
43
44
45
46
47
48
49
// 这里自己定义了和系统 Block_layout 布局一致的 block 结构体
// Block internals.
typedef NS_OPTIONS(int, AspectBlockFlags) {
AspectBlockFlagsHasCopyDisposeHelpers = (1 << 25),
AspectBlockFlagsHasSignature = (1 << 30)
};
typedef struct _AspectBlock {
__unused Class isa;
AspectBlockFlags flags;
__unused int reserved;
void (__unused *invoke)(struct _AspectBlock *block, ...);
struct {
unsigned long int reserved;
unsigned long int size;
// requires AspectBlockFlagsHasCopyDisposeHelpers
void (*copy)(void *dst, const void *src);
void (*dispose)(const void *);
// requires AspectBlockFlagsHasSignature
const char *signature;
const char *layout;
} *descriptor;
// imported variables
} *AspectBlockRef;

// 用该方法获取 block 的 signature
static NSMethodSignature *aspect_blockMethodSignature(id block, NSError **error) {
// 将 block 强转为自己定义的结构体:AspectBlockRef,和系统 Block_layout 定义的一致
AspectBlockRef layout = (__bridge void *)block;
if (!(layout->flags & AspectBlockFlagsHasSignature)) {
NSString *description = [NSString stringWithFormat:@"The block %@ doesn't contain a type signature.", block];
AspectError(AspectErrorMissingBlockSignature, description);
return nil;
}
void *desc = layout->descriptor;
// 1、偏移 reserved、size 两个 Int 类型的大小
desc += 2 * sizeof(unsigned long int);
if (layout->flags & AspectBlockFlagsHasCopyDisposeHelpers) {
// 2、偏移 copy、dispose 两个 指针 类型的大小
desc += 2 * sizeof(void *);
}
if (!desc) {
NSString *description = [NSString stringWithFormat:@"The block %@ doesn't has a type signature.", block];
AspectError(AspectErrorMissingBlockSignature, description);
return nil;
}
// 3、即拿到了 signature
const char *signature = (*(const char **)desc);
return [NSMethodSignature signatureWithObjCTypes:signature];
}

将这些信息保存下来,在方法进入 forwardInvocation: 阶段,拿到方法的参数个数和入参值等信息分发到传入的 Block 上:

1
2
3
4
5
6
7
8
9
10
11
12
13
14
15
16
17
18
19
20
21
22
23
24
25
26
27
28
29
30
31
32
33
34
35
36
37
38
39
40
41
42
43
44
45
46
- (BOOL)invokeWithInfo:(id<AspectInfo>)info {
// block Invocation
NSInvocation *blockInvocation = [NSInvocation invocationWithMethodSignature:self.blockSignature];
// 要 hook 方法的 Invocation
NSInvocation *originalInvocation = info.originalInvocation;
// 获取参数个数
NSUInteger numberOfArguments = self.blockSignature.numberOfArguments;

// Be extra paranoid. We already check that on hook registration.
if (numberOfArguments > originalInvocation.methodSignature.numberOfArguments) {
AspectLogError(@"Block has too many arguments. Not calling %@", info);
return NO;
}

// The `self` of the block will be the AspectInfo. Optional.
if (numberOfArguments > 1) {
// block 与普通 OC 方法不同的是第 0 位是 block 自己,往后排列的是参数。
// 这里第 1 位存放 info 信息,从第 2 位开始恰好和普通参数位置对其
[blockInvocation setArgument:&info atIndex:1];
}

void *argBuf = NULL;
// 普通 OC 方法的第 0 位是 id 类型,即对象自己;第 1 位 是 SEL 类型,即方法本身;往后排列的才是参数
// 所以这里从 index=2 开始遍历
for (NSUInteger idx = 2; idx < numberOfArguments; idx++) {
const char *type = [originalInvocation.methodSignature getArgumentTypeAtIndex:idx];
NSUInteger argSize;
NSGetSizeAndAlignment(type, &argSize, NULL);

if (!(argBuf = reallocf(argBuf, argSize))) {
AspectLogError(@"Failed to allocate memory for block invocation.");
return NO;
}

// 对方法对应位置上取出入参值赋予 block Invocation 对应位置上
[originalInvocation getArgument:argBuf atIndex:idx];
[blockInvocation setArgument:argBuf atIndex:idx];
}

[blockInvocation invokeWithTarget:self.block];

if (argBuf != NULL) {
free(argBuf);
}
return YES;
}

移花接木:libffi

libffi 相当于 C 语言上的 runtime,拥有动态调用 C 方法及 OC 方法的能力。简单介绍下用法,例如,调用 C 函数:

1
2
3
4
5
6
7
8
9
10
11
12
13
14
15
16
17
18
int c_func(int a , int b) {
int sum = a + b;
return sum;
}

- (void)libffi_call_c_func {
ffi_cif cif;
ffi_type *argTypes[] = {&ffi_type_sint, &ffi_type_sint};
ffi_prep_cif(&cif, FFI_DEFAULT_ABI, 2, &ffi_type_sint, argTypes);

int a = 1;
int b = 2;
void *args[] = {&a, &b};
int retValue;
ffi_call(&cif, (void *)c_func, &retValue, args); // retValue = 3

NSLog(@"libffi_call_c_func, retValue:%d", retValue);
}

调用 OC 函数:

1
2
3
4
5
6
7
8
9
10
11
12
13
14
15
16
17
18
19
20
21
22
- (int)oc_func:(int)a b:(int)b {
int sum = a + b;
return sum;
}

- (void)libffi_call_oc_func {
SEL selector = @selector(oc_func:b:);
NSMethodSignature *signature = [self methodSignatureForSelector:selector];

ffi_cif cif;
ffi_type *argTypes[] = {&ffi_type_pointer, &ffi_type_pointer, &ffi_type_sint, &ffi_type_sint};
ffi_prep_cif(&cif, FFI_DEFAULT_ABI, (uint32_t)signature.numberOfArguments, &ffi_type_sint, argTypes);

int arg1 = 1;
int arg2 = 2;
void *args[] = {(__bridge void *)(self), selector, &arg1, &arg2};
int retValue;
IMP func = [self methodForSelector:selector];
ffi_call(&cif, (void *)func, &retValue, args); // retValue = 3

NSLog(@"libffi_call_oc_func, retValue:%d", retValue);
}

函数调用 ffi_call 方法需要传入:1、函数模版(ffi_cif),2、函数指针,3、返回值,4、参数数组 这四个参数字段。
重点在于 函数模版(ffi_cif)。用 ffi_cif 生成一套函数模版,这个模版定义了调用一个函数时,这个函数的:1、参数个数(int),2、返回值类型(ffi_type),3、包含各个入参类型(ffi_type)的数组

这样,libffiffi_call 方法就可以根据这个传入的 函数模版(ffi_cif)去调用函数了。

ffi_type 类型对应着系统的 Type Encodings 类型

除了动态调用 C & OC 方法外,libffi 提供的另外一个关键的能力是:
通过 ffi_closure_alloc 方法创建一个关联着函数指针(IMP)的闭包(closure
通过 ffi_prep_closure_loc 函数给 cif 关联上这个闭包,并传入一个函数实体(fun)和刚才闭包里的 IMP

这样,当 IMP 被执行的时候,就会执行函数实体(fun),并且能在这个函数里拿到:1、cif,2、返回值,3、参数地址,4、自定义的关联数据(userdata),例如:

1
2
3
4
5
6
7
8
9
10
void *newIMP = NULL;
ffi_closure *closure = ffi_closure_alloc(sizeof(ffi_closure), (void **)&newIMP);
ffi_status prepClosureStatus = ffi_prep_closure_loc(closure, cif, holo_lifecycle_ffi_closure_func, (__bridge void *)info, newIMP);
if (prepClosureStatus != FFI_OK) {
return;
}

static void holo_lifecycle_ffi_closure_func(ffi_cif *cif, void *ret, void **args, void *userdata) {

}

有了这样的能力,我们就可以将上述的 newIMP 与我们要 hook 的方法 IMP 交换,这样调用 hook 方法的时候,就会执行到 holo_lifecycle_ffi_closure_func 方法,在这个方法里可以拿到原方法的参数个数、参数类型能信息,我们只要在这个方法里再调用一下原方法的 IMP,并在之前和之后分别调用要转发的目标对象的同名方法即可。

实现了一份简单版的基于 libffi 的 hook 方法代码:

1
2
3
4
5
6
7
8
9
10
11
12
13
14
15
16
17
18
19
20
21
22
23
24
25
26
27
28
29
30
31
32
33
34
35
36
37
38
39
40
41
42
43
44
45
46
47
48
49
50
51
52
53
54
55
56
57
58
59
60
61
62
63
64
65
66
67
68
69
70
71
72
73
74
75
76
77
78
79
80
81
82
83
84
85
86
87
88
89
90
91
92
93
94
95
96
97
98
99
100
101
102
103
104
105
106
107
108
109
110
111
112
113
114
115
116
117
118
119
120
121
122
123
124
125
126
127
128
129
130
131
132
133
134
135
136
137
138
139
140
141
142
143
144
145
146
147
148
149
150
151
152
153
154
155
156
157
158
159
160
161
162
163
164
165
166
167
168
169
170
171
172
173
174
175
176
177
178
179
180
181
182
183
184
185
186
187
188
189
190
191
192
193
194
195
196
197
198
199
200
201
202
203
204
205
206
207
208
209
210
211
212
213
214
215
216
217
218
219
220
221
222
223
224
225
226
227
228
229
230
231
232
233
234
235
236
237
238
239
240
241
242
243
244
245
246
247
@implementation NSObject (LibffiHook)

- (void)hook_method:(SEL)sel withBlock:(id)block {
libffi_hook_func(self, sel, block);
}

@end


// =================== LibffiHookInfo

@interface LibffiHookInfo : NSObject {
@public

Class cls;
SEL sel;
void *_originalIMP;
NSMethodSignature *_signature;

id _block;
ffi_cif *_block_cif;
void *_block_IMP;
}

@end

@implementation LibffiHookInfo

@end

// =================== LibffiHook


typedef void *LibffiHookBlockIMP;
typedef struct LibffiHookBlock_layout LibffiHookBlock;

struct LibffiHookBlock_layout {
void *isa; // initialized to &_NSConcreteStackBlock or &_NSConcreteGlobalBlock
volatile int flags; // contains ref count
int reserved;
void (*invoke)(void *, ...);
struct Block_descriptor_1 *descriptor;
// imported variables
};


@implementation LibffiHook

void libffi_hook_func(id obj, SEL sel, id block) {
NSString *selStr = [@"libffi_hook_" stringByAppendingString:NSStringFromSelector(sel)];
const SEL key = NSSelectorFromString(selStr);
if (objc_getAssociatedObject(obj, key)) {
return;
}

LibffiHookInfo *info = [LibffiHookInfo new];
info->cls = [obj class];
info->sel = sel;
info->_block = block;

objc_setAssociatedObject(obj, key, info, OBJC_ASSOCIATION_RETAIN_NONATOMIC);

Method method = class_getInstanceMethod([obj class], sel);
const char *typeEncoding = method_getTypeEncoding(method);
NSMethodSignature *signature = [NSMethodSignature signatureWithObjCTypes:typeEncoding];

info->_signature = signature;

const unsigned int argsCount = method_getNumberOfArguments(method);

// 1、构造参数类型列表
ffi_type **argTypes = calloc(argsCount, sizeof(ffi_type *));
for (int i = 0; i < argsCount; ++i) {
const char *argType = [signature getArgumentTypeAtIndex:i];
ffi_type *arg_ffi_type = libffi_hook_ffi_type(argType);
NSCAssert(arg_ffi_type, @"LibffiHook: can't find a ffi_type: %s", argType);
argTypes[i] = arg_ffi_type;
}

// 2、返回值类型
ffi_type *retType = libffi_hook_ffi_type(signature.methodReturnType);

// 3、准备 cif
// 需要在堆上开辟内存,否则会出现内存问题 (LibffiHookInfo 释放时会 free 掉)
ffi_cif *cif = calloc(1, sizeof(ffi_cif));
// 生成 ffi_cfi 模版对象,保存函数参数个数、类型等信息,相当于一个函数原型
ffi_status prepCifStatus = ffi_prep_cif(cif, FFI_DEFAULT_ABI, argsCount, retType, argTypes);
if (prepCifStatus != FFI_OK) {
NSCAssert(NO, @"LibffiHook: ffi_prep_cif failed: %d", prepCifStatus);
return;
}

// 4、生成新的 IMP
void *newIMP = NULL;
ffi_closure *closure = ffi_closure_alloc(sizeof(ffi_closure), (void **)&newIMP);
ffi_status prepClosureStatus = ffi_prep_closure_loc(closure, cif, libffi_hook_ffi_closure_func, (__bridge void *)info, newIMP);
if (prepClosureStatus != FFI_OK) {
NSCAssert(NO, @"LibffiHook: ffi_prep_closure_loc failed: %d", prepClosureStatus);
return;
}

// 5、替换 IMP 实现
Class hookClass = [obj class];
SEL aSelector = method_getName(method);
if (!class_addMethod(hookClass, aSelector, newIMP, typeEncoding)) {
IMP originIMP = method_setImplementation(method, newIMP);
if (info->_originalIMP != originIMP) {
info->_originalIMP = originIMP;
}
}


// 收集 block 信息(hook 的时候准备好,执行的时候会快点)
// block 没有 SEL,所以比普通方法少一个参数
uint blockArgsCount = argsCount - 1;
ffi_type **blockArgTypes = calloc(blockArgsCount, sizeof(ffi_type *));

// 1、构造参数类型列表
// 第一个参数是 block 自己,肯定为指针类型
blockArgTypes[0] = &ffi_type_pointer;
for (NSInteger i = 2; i < argsCount; ++i) {
blockArgTypes[i - 1] = libffi_hook_ffi_type([info->_signature getArgumentTypeAtIndex:i]);
}

// 2、准备 cif
ffi_cif *callbackCif = calloc(1, sizeof(ffi_cif));
if (ffi_prep_cif(callbackCif, FFI_DEFAULT_ABI, blockArgsCount, &ffi_type_void, blockArgTypes) == FFI_OK) {
info->_block_cif = callbackCif;
} else {
NSCAssert(NO, @"ffi_prep_cif failed");
}

// 3、获取 block IMP
LibffiHookBlock *blockRef = (__bridge LibffiHookBlock *)block;
info->_block_IMP = blockRef->invoke;
}

static void libffi_hook_ffi_closure_func(ffi_cif *cif, void *ret, void **args, void *userdata) {
LibffiHookInfo *info = (__bridge LibffiHookInfo *)userdata;

// 1、before

// NSLog(@"LibffiHook before, class: %@, sel: %@", NSStringFromClass(info->cls), NSStringFromSelector(info->sel));


// 2、call original IMP

ffi_call(cif, info->_originalIMP, ret, args);


// 3、after 回调 block

// block 没有 SEL,所以比普通方法少一个参数
void **callbackArgs = calloc(info->_signature.numberOfArguments - 1, sizeof(void *));
// 第一个参数是 block 自己
callbackArgs[0] = (__bridge void *)(info->_block);
// 从 index = 2 位置开始把 args 中的数据拷贝到 callbackArgs中 (从 index = 1 开始,第 0 个位置留给 block 自己)
memcpy(callbackArgs + 1, args + 2, sizeof(*args)*(info->_signature.numberOfArguments - 2));
// for (NSInteger i = 2; i < info->_signature.numberOfArguments; ++i) {
// callbackArgs[i - 1] = args[i];
// }
ffi_call(info->_block_cif, info->_block_IMP, NULL, callbackArgs);
free(callbackArgs);
}


NS_INLINE ffi_type *libffi_hook_ffi_type(const char *c) {
switch (c[0]) {
case 'v':
return &ffi_type_void;
case 'c':
return &ffi_type_schar;
case 'C':
return &ffi_type_uchar;
case 's':
return &ffi_type_sshort;
case 'S':
return &ffi_type_ushort;
case 'i':
return &ffi_type_sint;
case 'I':
return &ffi_type_uint;
case 'l':
return &ffi_type_slong;
case 'L':
return &ffi_type_ulong;
case 'q':
return &ffi_type_sint64;
case 'Q':
return &ffi_type_uint64;
case 'f':
return &ffi_type_float;
case 'd':
return &ffi_type_double;
case 'F':
#if CGFLOAT_IS_DOUBLE
return &ffi_type_double;
#else
return &ffi_type_float;
#endif
case 'B':
return &ffi_type_uint8;
case '^':
return &ffi_type_pointer;
case '@':
return &ffi_type_pointer;
case '#':
return &ffi_type_pointer;
case ':':
return &ffi_type_pointer;
case '{': {
// http://www.chiark.greenend.org.uk/doc/libffi-dev/html/Type-Example.html
ffi_type *type = malloc(sizeof(ffi_type));
type->type = FFI_TYPE_STRUCT;
NSUInteger size = 0;
NSUInteger alignment = 0;
NSGetSizeAndAlignment(c, &size, &alignment);
type->alignment = alignment;
type->size = size;
while (c[0] != '=') ++c; ++c;

NSPointerArray *pointArray = [NSPointerArray pointerArrayWithOptions:NSPointerFunctionsOpaqueMemory];
while (c[0] != '}') {
ffi_type *elementType = NULL;
elementType = libffi_hook_ffi_type(c);
if (elementType) {
[pointArray addPointer:elementType];
c = NSGetSizeAndAlignment(c, NULL, NULL);
} else {
return NULL;
}
}
NSInteger count = pointArray.count;
ffi_type **types = malloc(sizeof(ffi_type *) * (count + 1));
for (NSInteger i = 0; i < count; i++) {
types[i] = [pointArray pointerAtIndex:i];
}
types[count] = NULL; // terminated element is NULL

type->elements = types;
return type;
}
}
return NULL;
}

@end

libffi_hook_ffi_type 方法直接拷贝自:Stinger 里的 ffi_type *_st_ffiTypeWithType(const char *c) 方法

偷梁换柱:fishhook

以 hook NSLog 为例,使用方式如下:

1
2
3
4
5
6
7
8
9
10
11
12
13
14
15
16
17
18
19
20
21
22
23
24
25
26
27
- (void)fishhook_nslog {
NSLog(@"fishhook before"); // fishhook before

struct rebinding rebindingLog;
// 需要 hook 的方法名
rebindingLog.name = "NSLog";
// 用哪个方法来替换
rebindingLog.replacement = myLog;
// 保存原本函数指针
rebindingLog.replaced = (void **)&sys_nslog;

struct rebinding rebindings[] = {rebindingLog};

rebind_symbols(rebindings, 1);

NSLog(@"fishhook after"); // fishhook after---->🍺🍺🍺
}


// 函数指针,用来保存原来的函数
static void (*sys_nslog)(NSString *format, ...);

// 新函数(注意:不定参数未处理)
void myLog(NSString * _Nonnull format, ...) {
NSString *message = [format stringByAppendingString:@"---->🍺🍺🍺"];
(*sys_nslog)(message);
}

fishhook 是 FaceBook 出品的能够 hook 动态库方法的框架(注意:仅能 hook 系统动态库方法),其源代码仅仅不足两百行,但是要搞明白这两百行代码的工作原理所需要的基础知识却是非常多的。

以下是 App 启动的大致过程,大致分为:开辟进程、加载可执行文件、加载 Dyld、Dyld 加载各个动态库、Rebase(因为 ALSR 技术进行基址重定位)、Bind(动态库的符号绑定)、加载 OC 类,分类、init 方法、调用 Main 函数、调用 UIApplicationMain 函数、起一个主线程的 runloop。

launch

fishhook 的工作原理就是 Bind 阶段:符号重绑定。

普及一些涉及的基础概念:

为什么要动态链接?

远古时代,所有源代码都在一个文件上(想象下开发一个App,所有源代码都在main.m上,这个 main.m 有几百万行代码。多人协同开发、如何维护、复用、每次编译几分钟….)。
为了解决上面问题,于是有了静态链接。像我们平时开发,每个人开发自己的模块功能,最后编译链接在一起。解决了协同开发、可维护、可复用、编译速度也很快了(未改动的模块用编译好的缓存)。

静态链接好像已经很完美了。我们平时开发 App,都会用到 UIKit、Foundation 等许多系统库。假如都是通过静态链接的,手机里每个App都包含了一份这些系统库,每个App包体积变大了,占用磁盘空间;每个 App 运行时都要在内存里分别加载这些库,占用内存。

假设 UIKit 里某个函数有bug,需要更新,所有 App 都要重新静态链接最新的 UIKit 库,然后发版。

为了这些问题,于是产生了动态链接。

position-independent code (PIC 地址无关代码)

产生地址无关代码原因:dylib 在编译时候,是不知道自己在进程中的虚拟内存地址的。因为 dylib 可以被多个进程共享,比如进程 1 可以在空闲地址 0x1000-0x2000 放共享对象 a,但是进程 2 的 0x1000-0x2000 已经被主模块占用了,只有空闲地址 0x3000-0x4000 可以放这个共享对象 a。
所以共享对象 a 里面有一个函数,在进程 1 中的虚拟内存地址是 0x10f4,在进程 2 中的虚拟内存地址就成了 0x30f4。那机器指令就不能包含绝地地址了(动态库代码段所有进程共享;可修改的数据段,每个进程有一个副本,私有的)。

PIC原理:为了解决 dylib 的代码段能被共享,PIC(地址无关代码)技术就产生了。PIC 原理就是把指令中那些需要被修改的部分分离出来,跟数据部分放在一起,这样指令部分就可以保持不变,而数据部分是每个进程都有一个副本。

ALSR:

在计算机科学中,地址空间配置随机加载(英语:Address space layout randomization,缩写ASLR,又称地址空间配置随机化、地址空间布局随机化)是一种防范内存损坏漏洞被利用的计算机安全技术。ASLR通过随机放置进程关键数据区域的地址空间来防止攻击者能可靠地跳转到内存的特定位置来利用函数。现代操作系统一般都加设这一机制,以防范恶意程序对已知地址进行Return-to-libc攻击。

Mach-O 文件

在了解 fishhook 的具体原理之前还要熟悉下 Mach-O 文件:MacOS 上的可执行文件格式,类似于 Linux 和大部分 UNIX 的原生格式 ELF(Extensible Firmware Interface)。

Mach-O

1、Header:magic 魔数,内核识别 MachO
2、Load Commands:存储 Mach-O 的布局信息
3、Data:包含实际的代码和数据,Data 被分割为多个 Segment。每个 Segment 被分割为多个 Section,分别存放不同的数据

标准的三个 Segment:TEXT、DATA、LINKEDIT

3.1、TEXT:代码段,只读可执行,存储函数的二进制代码(__text),常量字符串(__cstring),Objective C 的类/方法名等信息
3.2、DATA:数据段,读写,存储 Objective C 的字符串(__cfstring),以及运行时的元数据:class/protocol/method…
3.3、LINKEDIT:启动 App 需要的信息,如 bind & rebase 的地址,代码签名,符号表…

Mach-O 中 __DATA 段有两个 Section 与动态符号绑定有关系

__nl_symbol_ptr :存储了 non-lazily 绑定的符号,这些符号在 Mach-O 加载的时候绑定完成
__la_symbol_ptr :存储了 lazy 绑定的方法,这些方法在第一次调用时,由 dyld_stub_binder 进行绑定

为了实现系统动态库的共用,有了上文提到的动态链接。PIC 原理里提到了把那些需要共用的符号放在了 DATA 段,DATA 段的权限是可读写的,fishhook 就是在运行期修改 DATA 段里的数据,把系统符号绑定的地址重新绑定位我们自己定义的 hook 函数地址。

比如 NSLog 就是懒加载的,在第一次访问 NSLog 符号的时候先去 stub,stub 告诉从 __la_symbol_ptr 查找,__la_symbol_ptr 表示还没有 NSLog 符号真实函数地址,需要动态绑定,于是去 __nl_symbol_ptr 查找 dyld_stub_binder 函数的地址,进行查找真实的 NSLog 地址。
找到后调用 NSLog 函数,并把这个地址保存进 __la_symbol_ptr。

下次调用 NSLog 函数的时候在 __la_symbol_ptr 就能得到真实地址进行跳转。

fashhook 工作流程:

下图是 fashhook 在 GitHub 上 README.md 里的图,非常清晰的介绍了 fashhook 的工作流程:
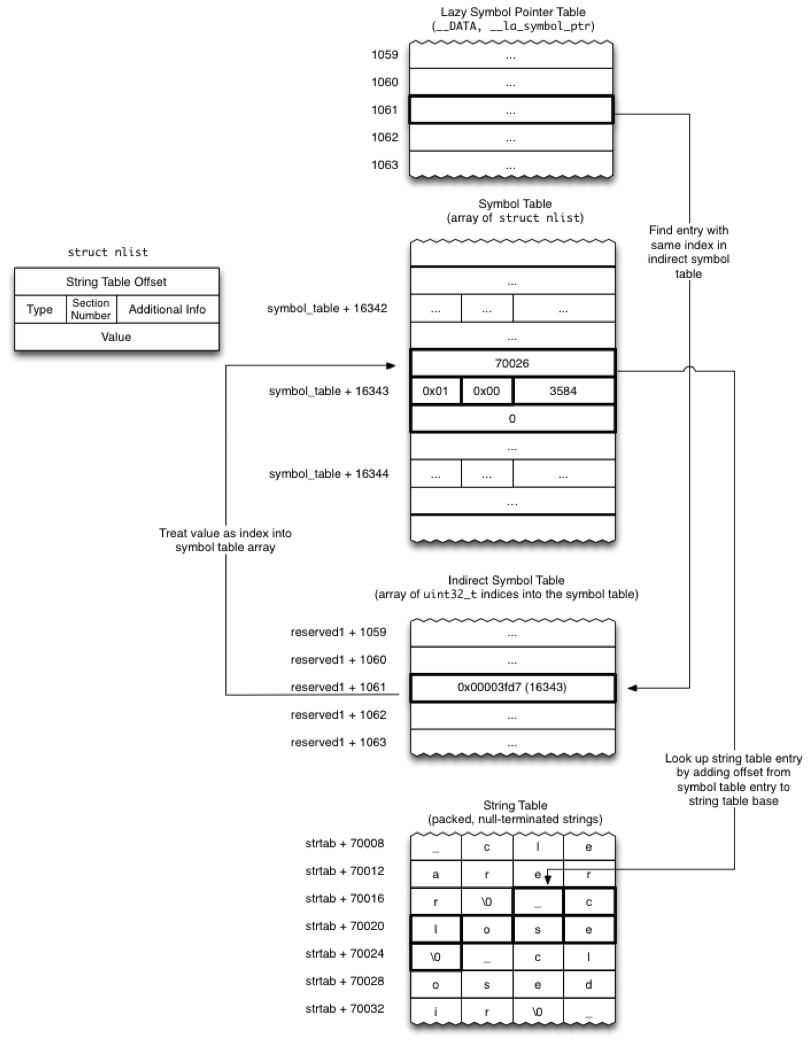
fashhook

以 hook NSLog 方法为例:

1、在 Lazy Symbol Pointer Table 找到 NSLog 顺序
2、按上面的顺序在 Indirect Symbol Table 找到 NSLog
3、把 Indirect Symbol Table 中 NSLog 的 data 值转为 10 进制,作为角标在 Symbols Table -> Symbols 中查找
4、把 Symbols 表中 NSLog 的 data 值加上 String Table 中的第一条数据(base value)的值,确认找到了目标符号

把 Lazy Symbol Pointer Table 里的角标位置上的值修改为我们自己函数的地址,即完成了符号重绑定过程。

核心代码如下:

1
2
3
4
5
6
7
8
9
10
11
12
13
14
15
16
17
18
19
20
21
22
23
24
25
26
27
28
29
30
31
32
33
34
35
36
37
38
39
40
41
42
43
44
45
// dyld 在 image 发生改变时,主动调用回调函数
_dyld_register_func_for_add_image(_rebind_symbols_for_image);

// slide 即 ALSR 产生的随机偏移量
static void _rebind_symbols_for_image(const struct mach_header *header,
intptr_t slide) {
rebind_symbols_for_image(_rebindings_head, header, slide);
}


static void perform_rebinding_with_section(struct rebindings_entry *rebindings,
section_t *section,
intptr_t slide,
nlist_t *symtab,
char *strtab,
uint32_t *indirect_symtab) {
uint32_t *indirect_symbol_indices = indirect_symtab + section->reserved1;
void **indirect_symbol_bindings = (void **)((uintptr_t)slide + section->addr);
for (uint i = 0; i < section->size / sizeof(void *); i++) {
uint32_t symtab_index = indirect_symbol_indices[i];
if (symtab_index == INDIRECT_SYMBOL_ABS || symtab_index == INDIRECT_SYMBOL_LOCAL ||
symtab_index == (INDIRECT_SYMBOL_LOCAL | INDIRECT_SYMBOL_ABS)) {
continue;
}
uint32_t strtab_offset = symtab[symtab_index].n_un.n_strx;
char *symbol_name = strtab + strtab_offset;
struct rebindings_entry *cur = rebindings;
while (cur) {
for (uint j = 0; j < cur->rebindings_nel; j++) {
if (strlen(symbol_name) > 1 &&
strcmp(&symbol_name[1], cur->rebindings[j].name) == 0) {
if (cur->rebindings[j].replaced != NULL &&
indirect_symbol_bindings[i] != cur->rebindings[j].replacement) {
*(cur->rebindings[j].replaced) = indirect_symbol_bindings[i];
}
// 找到目标位置,将该角标下的函数地址修改为我们自己的 hook 函数地址
indirect_symbol_bindings[i] = cur->rebindings[j].replacement;
goto symbol_loop;
}
}
cur = cur->next;
}
symbol_loop:;
}
}

李代桃僵:静态库插桩

主要是 静态插桩的方式来实现Hook Method 这个文化里提到的技术,

文章里主要是操作的 _objc_msgSend 方法。基本原理大概是:

把自己的组件打成静态库,编译阶段因为不知道引用的外部符号的具体地址,只在符号表里做了标记,需要在链接阶段再查找外部符号的引用进行绑定。

通过脚本手动替换掉 .a 文件里的符号(_objc_msgSend)为我们自定义的符号(_hook_msgSend),注意两个符号必须等长。

再自己在 text 段定义一个 _hook_msgSend 函数,这样,链接阶段查找外部符号就绑定成了自己定义的函数。

脚本代码如下,需要对 Mach-O 格式非常熟悉:

1
2
3
4
5
6
7
8
9
10
11
12
13
14
15
16
17
18
19
20
21
22
23
24
25
26
27
28
29
30
31
32
33
34
35
36
37
38
39
40
41
42
43
44
45
46
47
48
49
50
51
52
53
54
55
56
57
58
59
60
61
62
63
64
65
66
67
68
69
70
71
72
73
74
75
76
77
78
79
80
81
82
83
84
85
86
87
88
89
90
91
92
93
94
95
96
97
98
99
100
101
102
103
104
105
106
107
108
109
110
111
112
113
114
115
116
117
118
119
120
121
122
123
124
125
126
127
128
129
130
131
132
133
134
135
136
137
138
139
140
141
142
143
144
145
146
147
148
149
150
151
152
153
154
155
156
157
158
159
160
161
162
163
164
165
166
167
168
169
170
171
172
173
174
175
176
177
178
179
180
181
182
183
184
185
186
187
188
189
190
191
192
193
194
195
196
197
198
199
200
201
202
203
204
205
206
207
208
209
210
211
212
213
214
215
216
217
218
219
220
221
222
223
224
225
226
227
228
229
230
231
232
233
# -*- coding: utf-8 -*
import os
import re
import struct
from pathlib import Path

'''
静态库结构

1、魔数 8个字节
magic(8) = '!<arch>\n'

2、符号表头结构 80个字节
struct symtab_header {
char name[16]; /* 名称 */
char timestamp[12]; /* 库创建的时间戳 */
char userid[6]; /* 用户id */
char groupid[6]; /* 组id */
uint64_t mode; /* 文件访问模式 */
uint64_t size; /* 符号表占总字节大小 */
uint32_t endheader; /* 头结束标志 */
char longname[20]; /* 符号表长名 */
};

3、符号表 4+size个字节
struct symbol_table {
uint32_t size; /* 符号表占用的总字节数 */
symbol_info syminfo[0]; /* 符号信息,它的个数是 size / sizeof(symbol_info) */
};

3、字符串表 4+size个字节
struct stringtab
{
int size; //字符串表的尺寸
char strings[0]; //字符串表的内容,每个字符串以\0分隔。
};

4、目标文件头结构(跟符号表头结构一样) 80个字节

struct object_header {
char name[16]; /* 名称 */
char timestamp[12]; /* 目标文件创建的时间戳 */
char userid[6]; /* 用户id */
char groupid[6]; /* 组id */
uint64_t mode; /* 文件访问模式 */
uint64_t size; /* 符号表占总字节大小 */
uint32_t endheader; /* 头结束标志 */
char longname[20]; /* 符号表长名 */
};

5、目标文件
这个可以参考我的博客:https://juejin.im/post/5d5275b251882505417927b5

.....4、5循环(如果有多个目标文件)

'''

def deal_fat_file():
global staticLibPath, fatFilePath
fatFilePath = staticLibPath
(fatFileDir, fatFileName) = os.path.split(fatFilePath)
fatFileName = 'tmp-arm64-'+fatFileName
staticLibPath = os.path.join(fatFileDir, fatFileName)
os.system('lipo ' + fatFilePath + ' -thin ' + 'arm64 -output '+ staticLibPath)


def replace_fat_file():
os.system('lipo '+fatFilePath+' -replace arm64 '+staticLibPath+' -output '+fatFilePath)
os.remove(staticLibPath)


def get_valid_staticLib_path():
if not Path(staticLibPath).is_file():
return False, 'invalid path, please input valid staticLib path!!!'
output = os.popen('lipo -info '+staticLibPath).read().strip()
if not output.endswith('architecture: arm64'): # re.match(r'.*architecture: arm64$', output):
if output.startswith('Architectures in the fat file:') and output.find('arm64'):
deal_fat_file()
else:
return False, 'invalid staticLib or fat file not contain arm64 lib'
with open(staticLibPath, 'rb') as fileobj:
magic = fileobj.read(8)
(magic,) = struct.unpack('8s', magic)
magic = magic.decode('utf-8')
if not magic == '!<arch>\n':
return False, 'error magic, invalid staticLib.'
return True, 'valid path!'


# 返回(name, location, size)
def resolver_object_header(offset):
with open(staticLibPath, 'rb') as fileobj:
fileobj.seek(offset)
name = fileobj.read(16)
(name,) = struct.unpack('16s', name)
name = name.decode()
# offset(48+offset) = offset + name(16) + timestamp(12) + userid(6) + groupid(6) + mode(8)
fileobj.seek(48+offset)
size = fileobj.read(8)
(size,) = struct.unpack('8s', size)
size = int(size.decode())
location = 60 + offset
if name.startswith('#1/'):
nameLen = int(name[3:])
size = size - nameLen
location = location + nameLen
fileobj.seek(60+offset)
name = fileobj.read(nameLen)
(name,) = struct.unpack(str(nameLen)+'s', name)
name = name.decode().strip()
return (name, location, size)


def find_symtab(location, size):
with open(staticLibPath, 'rb') as fileobj:
fileobj.seek(location)
magic = fileobj.read(4)
(magic,) = struct.unpack('I', magic)
# arm64 mach-o magic
if not magic == 0xFEEDFACF:
exit('静态库里的machO文件不是arm64平台的!')
fileobj.seek(location+16)
num_command = fileobj.read(4)
(num_command,) = struct.unpack('I', num_command)
offset = location+32
while num_command > 0:
fileobj.seek(offset)
cmd = fileobj.read(4)
(cmd,) = struct.unpack('I', cmd)
if cmd == 0x2: # LC_SYMTAB = 0x2
offset = offset + 16
fileobj.seek(offset)
stroff = fileobj.read(4)
(stroff,) = struct.unpack('I', stroff)
strsize = fileobj.read(4)
(strsize,) = struct.unpack('I', strsize)
symtabList_loc_size.append((stroff+location, strsize))
break
cmd_size = fileobj.read(4)
(cmd_size,) = struct.unpack('I', cmd_size)
offset = offset + cmd_size


def replace_Objc_MsgSend(fileLen):
print('开始替换objc_msgSend...(静态库很大的话,可能需要等十几秒)!!!')
pos = 0
bytes = b''
(loc, size) = symtabList_loc_size[0]
listIndex = 1
with open(staticLibPath, 'rb') as fileobj:
while pos < fileLen:
if pos == loc:
content = fileobj.read(size)
content = content.replace(b'\x00_objc_msgSend\x00', b'\x00_hook_msgSend\x00')
pos = pos + size
if listIndex < len(symtabList_loc_size):
(loc, size) = symtabList_loc_size[listIndex]
listIndex = 1 + listIndex
else:
step = 4
if loc > pos:
step = loc - pos
else:
step = fileLen - pos
content = fileobj.read(step)
pos = pos + step
bytes = bytes + content
with open(staticLibPath, 'wb+') as fileobj:
print('开始写入文件...')
fileobj.write(bytes)

if len(fatFilePath) > 0:
replace_fat_file()

print('处理完了!!!')


need_process_objFile = set() # set('xx1', 'xx2') 表示静态库中,仅xx1跟xx2需要处理
needless_process_objFile = set() # set('xx1', 'xx2') 表示静态库中,xx1跟xx2不需要处理,剩下的都需要处理

def process_object_file(name, location, size):
# 根据需要,下面三行中,只需打开一行,另外两行需要注释掉
process_mode = 'default' # 默认处理该静态库中的所有目标文件(类)
#process_mode = 'need_process_objFile' # 只处理need_process_objFile集合(上面的集合,需要赋值)中的类
#process_mode = 'needless_process_objFile' # 除了needless_process_objFile集合(上面的集合,需要赋值)中的类不处理,剩下的都需要处理

# 这里可以过滤不需要处理的目标文件,或者只选择需要处理的目标文件
# 默认处理该静态库中的所有目标文件
if process_mode == 'need_process_objFile':
if name in need_process_objFile:
find_symtab(location, size)
elif process_mode == 'needless_process_objFile':
if not name in need_process_objFile:
find_symtab(location, size)
else:
find_symtab(location, size)


# 静态库的路径
staticLibPath = '完整的静态库路径'
fatFilePath = str()
# objc_msgSend被替换的名字(两者长度需一致)
# hookObjcMsgSend-arm64.s里定义了函数名为hook_msgSend,如果修改脚本里的函数名,hookObjcMsgSend-arm64.s里的函数名,也需跟脚本保持一致
# 建议不修改hook_msgSend
hook_msgSend_method_name = 'hook_msgSend'
symtabList_loc_size = list()


if __name__ == '__main__':
# staticLibPath = '/Users/xx/xx/xx'.strip()
staticLibPath = input('请输入静态库的路径:').strip()

if not len(hook_msgSend_method_name) == len('objc_msgSend'):
exit('need len(\'hook_msgSend\') == len(\'objc_msgSend\')!')
isValid, desc = get_valid_staticLib_path()
if not isValid:
exit(desc)
# 找到每个目标文件里的字符串表location 跟 size
fileLen = Path(staticLibPath).stat().st_size
offset = 8
while offset < fileLen:
(name, location, size) = resolver_object_header(offset)
offset = location+size
endIndex = name.find('.o')
if endIndex == -1:
#静态库的符号表,不需要处理
continue
process_object_file(name[:endIndex], location, size)
if len(symtabList_loc_size) > 0:
replace_Objc_MsgSend(fileLen)

在 text 段定义一个 _hook_msgSend 函数:

1
2
3
4
5
6
7
8
9
10
11
12
13
14
15
16
17
18
19
20
21
22
23
24
25
26
27
28
29
30
31
32
33
34
35
36
37
38
39
40
41
42
43
44
45
46
47
48
49
50
51
52
53
54
55
56
57
58
59
60
61
62
63
64
65
66
67
68
69
70
#ifdef __arm64__
#include <arm/arch.h>


.macro ENTRY /* name */
.text
.align 5
.private_extern $0
$0:
.endmacro

.macro END_ENTRY /* name */
LExit$0:
.endmacro


.macro BACKUP_REGISTERS
stp q6, q7, [sp, #-0x20]!
stp q4, q5, [sp, #-0x20]!
stp q2, q3, [sp, #-0x20]!
stp q0, q1, [sp, #-0x20]!
stp x6, x7, [sp, #-0x10]!
stp x4, x5, [sp, #-0x10]!
stp x2, x3, [sp, #-0x10]!
stp x0, x1, [sp, #-0x10]!
str x8, [sp, #-0x10]!
.endmacro

.macro RESTORE_REGISTERS
ldr x8, [sp], #0x10
ldp x0, x1, [sp], #0x10
ldp x2, x3, [sp], #0x10
ldp x4, x5, [sp], #0x10
ldp x6, x7, [sp], #0x10
ldp q0, q1, [sp], #0x20
ldp q2, q3, [sp], #0x20
ldp q4, q5, [sp], #0x20
ldp q6, q7, [sp], #0x20
.endmacro

.macro CALL_HOOK_BEFORE
BACKUP_REGISTERS
mov x2, lr
bl _hook_objc_msgSend_before
RESTORE_REGISTERS
.endmacro

.macro CALL_HOOK_AFTER
BACKUP_REGISTERS
bl _hook_objc_msgSend_after
mov lr, x0
RESTORE_REGISTERS
.endmacro

# hookObjcMsgSend.py里定义了函数名为hook_msgSend,如果修改脚本里的函数名,这里的函数名,也需跟脚本保持一致
ENTRY _hook_msgSend

CALL_HOOK_BEFORE
bl _objc_msgSend
CALL_HOOK_AFTER
ret

END_ENTRY _hook_msgSend

// void hook_msgSend(...);
//ENTRY _hook_msgSend_stret
//b _hook_msgSend
//END_ENTRY _hook_msgSend_stret

#endif

简单解释下以上 _hook_msgSend 的汇编代码:

ARM64 有 31 个通用寄存器,每个寄存器可以存取一个 64 位的数据。我们可以通过 X0 - X30 来对这些寄存器进行寻址。对应 X0 - X30W0 - W30 对应的就是相同单元数的低 32 位。W0 - W30 当进行写入操作时,会将高 32 位清零。

每一个寄存器具体的作用:

X0 - X7:这 8 个寄存器主要 用来存储传递参数 。如果参数超过 8 个,则会通过栈来传递 ;X0 也用来存放上文方法的返回值

X29 :即我们通常所说的帧指针 FP(Frame Pointer),指向当前方法栈的底部

X30 :即链接寄存器 LR(Link Register)。为什么叫做链接,是因为这个寄存器会记录着当前方法的调用方地址 ,即当前方法调用完成时应该返回的位置。例如我们遇到 Crash 要获取方法堆栈,其本质就是不断的向上递归每一个 X30 寄存器的记录状态(也就是栈上 X30 寄存器的内容)来找到上层调用方。

除了这些通用寄存器,还有一个最重要的 SP 寄存器:

SP 寄存器:即我们通常说的栈帧 SP(Stack Pointer)。指向当前方法栈的顶部。

这里 _hook_msgSend 方法里因为要用到 X0 - X7 等参数寄存器,所以每次保存下这些寄存器,调用原 _objc_msgSend 方法前再回复这些寄存器的内容,以保证上下文环境不被污染。

镜花水月:基于桥的全量方法 Hook 方案 TrampolineHook

这是 五子棋 开源的中心重定向框架:TrampolineHook,用法示例:

1
2
3
4
5
6
7
8
9
10
11
12
13
14
15
16
17
void myInterceptor() {
printf("调用了 myInterceptor\n");
}

- (void)trampolineHook {
THInterceptor *interceptor = [[THInterceptor alloc] initWithRedirectionFunction:(IMP)myInterceptor];
Method m = class_getInstanceMethod([HookDemoObj class], @selector(logString:));
IMP imp = method_getImplementation(m);
THInterceptorResult *interceptorResult = [interceptor interceptFunction:imp];
if (interceptorResult.state == THInterceptStateSuccess) {
method_setImplementation(m, interceptorResult.replacedAddress); // 设置替换的地址
}

// 执行到这一行时,会调用 myInterceptor 方法
HookDemoObj *obj = [HookDemoObj new];
[obj logString:@"abc"];
}

因为对 TrampolineHook 里的汇编代码还没完全看懂,之前 靛青 曾经写过一篇:TrampolineHook 学习笔记 这里就不错过多原理解析了。

除了以上提到的 Hook 方案,剩下还有 Dobby / Frida 逆向领域的 Hook 手段等,因为才疏学浅就不再继续解析了。