前言
最初,所有代码都在主工程的时候,资源文件也在主工程,尤其是大量的图片资源,不可避免的就是命名冲突问题。一般而言,我们需要一份严谨的命名规范,比如根据业务模块或者文件夹划分添加前缀,来避免命名冲入导致的翻车事故。
进行组件化之后,应用 CocoaPods,终于对命名冲突问题有了解决方案。在我们将主工程拆空,代码分拆至相应 Pod 之后,资源文件也应当拆分至对应 Pod,交由组件自己管理。这样将资源文件从主工程拆分到各个 Pod 不仅令职责划分更合理,额外获得的收益还有:
1、拆空主工程:方便版本号等设置项工程化管理;避免不同分支进行 Merge 操作覆盖更改
2、当前组件自己管理资源文件:减少外部依赖,方便独立运行
但因为 CocoaPods 提供的 use_frameworks!、static_framework、resource、resource_bundles 这些功能的选择,以及将其中一些功能组合使用之后资源文件的最终存储路径的不同,导致使用者对图片文件、字体文件、本地化文件、其他各种文件的种种处理方式不明所以。本文旨在讲清楚这些,并期望总结出对资源文件管理的最佳实践方案。
其实所谓的资源文件处理以及前文提到的 CocoaPods 提供的各种字段对资源文件的影响主要就是路径的差别,我们只需要搞清 将这些字段组合使用后的 资源文件的存储路径差别,处理起来就很简单了。
概念篇
use_frameworks!
use_frameworks tells CocoaPods that you want to use Frameworks instead of Static Libraries. Since Swift does not support Static Libraries you have to use frameworks.
来自 stackoverflow 的问答: Why do we use use_frameworks in CocoaPods?
该字段在 Podfile 文件中使用。主要是早期 Swift 不支持静态库,所以大家在 OC 工程里引入 Swift 的时候都需要引入该字段。
static_framework
Up until Xcode 9, support for building Swift into static libraries was non-existent and use of dynamic frameworks was required. This was a deal-breaker for some developers, particularly those worried about the launch performance implications of linked many dynamic binaries.
With CocoaPods 1.5.0, developers are no longer restricted into specifying use_frameworks! in their Podfile in order to install pods that use Swift. Interop with Objective-C should just work. However, if your Swift pod depends on an Objective-C, pod you will need to enable “modular headers” (see below) for that Objective-C pod.
来自 CocoaPods 的官网说明:CocoaPods 1.5.0 — Swift Static Libraries
该字段在 podspec 中声明。Xcode 9 开始,Swift 支持静态库了,CocoaPods 也添加了支持。
resource & resource_bundles
resource 字段在 podspec 中使用
For building the Pod as a static library, we strongly recommend library developers to adopt resource bundles as there can be name collisions using the resources attribute. Moreover, resources specified with this attribute are copied directly to the client target and therefore they are not optimised by Xcode.
来自 CocoaPods 的官网说明:resources
resource_bundles 字段在 podspec 中使用
For building the Pod as a static library, we strongly recommend library developers to adopt resource bundles as there can be name collisions using the resources attribute.
来自 CocoaPods 的官网说明:resource_bundles
这俩字段最主要的区别就在于 resource_bundles 会创建独立的 bundle,能够有效解决资源文件重名问题,也是 CocoaPods 强烈建议使用的字段。 resource 字段则不会创建属于 Pod 自己的 bundle。资源文件很可能会存储到 main bundle 里。对资源文件存储路径的影响在下一章节会有详细的总结。
组合场景下的资源文件存储路径
use_frameworks!、static_framework、resource_bundles、resources 的不同组合使用,会导致资源文件的最终存放路径不同,以下是各种场景下的路径总结:
1 | use_frameworks! |
(.app/. 代表的是 main bundle)
不同路径下的图片取值方式及差别可以参考这篇文章:CocoaPods的资源管理和Asset Catalog优化
需要注意的是,当 Pod 中的 .xcassets 类型资源文件最终存储在 main bundle 的话会和主工程的 .xcassets 文件冲突,编译会报错:
error: Multiple commands produce ‘/Users/gonghonglou/Library/Developer/Xcode/DerivedData/HoloResource-giqfnwiluvssbzbyvuhpkrjoewvd/Build/Products/Debug-iphonesimulator/HoloResource_Example.app/Assets.car’:
- Target ‘HoloResource_Example’ (project ‘HoloResource’) has compile command with input ‘/Users/gonghonglou/holo/HoloResource/Example/HoloResource/Images.xcassets’
- That command depends on command in Target ‘HoloResource_Example’ (project ‘HoloResource’): script phase “[CP] Copy Pods Resources”
解决方法,在 Podfile 里添加:
1 | install! 'cocoapods', :disable_input_output_paths => true |
题外话:Xcode 10 之后引入了新的编译系统,导致 Pod 里有代码改动的话无法及时编译进工程,解决方案也是上述方法。
参考:Build System Release Notes for Xcode 10
各类资源文件的处理:预编译宏
将资源文件放进各个组件里,最大的麻烦就是访问方式的更改,尤其是图片资源,如果组件内的资源文件不在 main bundle 路径下的话,原本使用 [UIImage imageNamed:@""]; 获取图片的方式就需要更改了。比如:
1 | NSString *bundlePath = [NSBundle bundleForClass:HoloResourceDemoA.class].resourcePath; |
而且需要根据不同的组件名称获取当前组件的 bundle,这就导致不同组件内需要提供不同的取值方法。
最简单的解决方案是将这些取值方法统一成单一方法,封装进一个基础类,每个组件调用时传入当前组件名称。根据上一节可以发现,最终不同的路径也就只有 4 种而已,如果我们能获取到当前组件的名称,也就可以分别到这 4 个路径下查找文件了。
但是每个组件调用这个基础类方法时仍然需要传入自己的组件名称,而且是字符串形式,还是会很麻烦。如果在代码执行当前行能够获取到当前 Pod 名称就好,那么我们就可以把这个 “获取代码执行当前行所在 Pod 名称” 的逻辑封装进统一方法里,少传一个参数。
好在 CocoaPods 给我们提供了给各个组件配置预编译宏的能力。虽然不是提供方法,但是可以提供 宏,在代码执行当前行拿到当前 Pod 名称。
方案一
在 podspec 里加上:
1 | # 配置 Xcode Build Setting |
即可在 HoloResource.debug.xcconfig / HoloResource.release.xcconfig 文件里的 GCC预编译头参数所在行:
1 | GCC_PREPROCESSOR_DEFINITIONS = $(inherited) COCOAPODS=1 |
添加预编译宏为:
1 | GCC_PREPROCESSOR_DEFINITIONS = $(inherited) COCOAPODS=1 'HOLO_POD_NAME=@("HoloResource")' |
相应的,在各 Pod 的 TARGET 里能看到的 Preprocessor Macros 为:
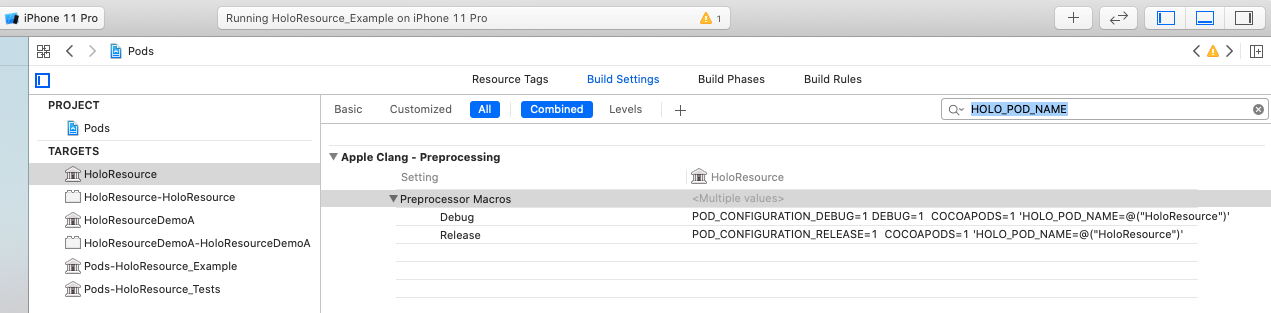
这样一来,在组件内使用 HOLO_POD_NAME 这个宏,就能得到 @"HoloResource" 这个字符串了。那我们就可以用这个宏来拼接不同的路径以加载资源文件。比如:
1 | [UIImage holo_imageNamed:name inBundle:HOLO_POD_NAME]; |
每个组件统一调用以上方法就可以访问自己的图片资源了,再把这个方法调用定义一个 宏,就满足我们的需求了,后续章节会给出具体实现。
方案二
但是这种在 podspec 里配置预编译宏的方式也会配置在主工程的 Pods-HoloResource_Example.debug.xcconfig / Pods-HoloResource_Example.release.xcconfig 文件里,这就导致了,如果多个组件配置了同名的预编译宏会有多个同名的配置出现在主工程,编译也会报警告。
替代这种方案的另一种实现是,在 Podfile 里 hook install,在 install 之后给每个工程配置一份预编译宏,通过 post_install 的能力:
1 | post_install do |installer| |
相应的,在各 Pod 的 TARGET 里能看到的 Preprocessor Macros 为:
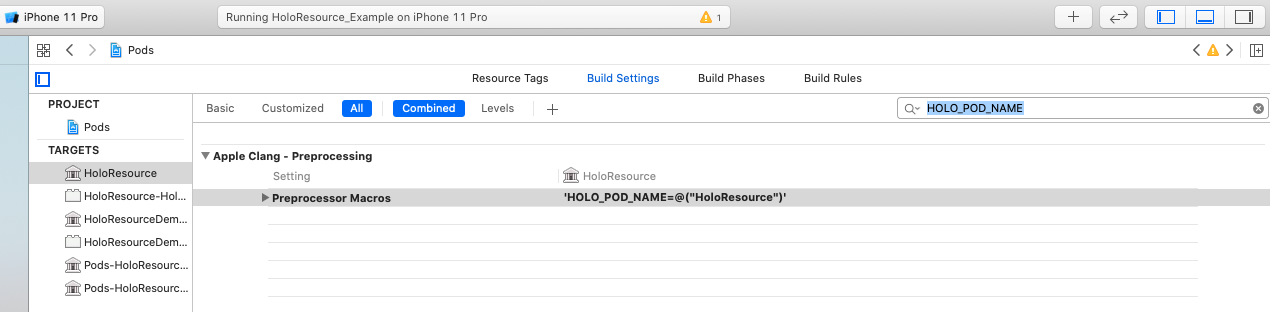
方案三(推荐)
虽然主工程 config 文件不会出现 HOLO_POD_NAME,也就不会报警告了。但是从以上图片可以看出,各个 Pod 工程的 Preprocessor Macros 直接被替换了。当然可以在 post_install 的 hook 里把缺失的哪些配置加上,先获取原来有哪些预编译宏,再加上 HOLO_POD_NAME。
或者可以通过脚本,在 install 之后把各个组件对应的 在 .debug.xcconfig / .release.xcconfig 文件里 GCC_PREPROCESSOR_DEFINITIONS 所在行拼上HOLO_POD_NAME=@(\"HoloResource\")即可。而且组件化之后大家应该都有封装的自己的 CocoaPods 命令工具,hook pod install 做些额外的工作,那只要再把这个配置预编译宏的逻辑加上就好了。
参考脚本 holo_pod_name_config.sh:
1 |
|
执行以上脚本(holo_pod_name_config.sh)默认给所有 Pod 添加配置,如果想指定某几个 Pod 添加配置的话给脚本传入参数,例如:
1 | sh holo_pod_name_config.sh PodA PodB PodC |
方案四(更新于 2020.6.14,推荐plus)
为了更方便的给组件配置预编译宏,我写了一个 CocoaPods 插件:cocoapods-resource,支持给任意 Pod 添加任意 预编译 宏。
用法如下:
1 | # 安装 |
各类资源处理实践
图片 UIImage
有了上一节的准备,剩下的工作就简单了许多,封装通用的图片获取方法,供所有组件使用:
1 |
|
实现为:
1 | @implementation UIImage (HoloResource) |
为了简化调用,提供了宏定义:每个组件调用 HoloImageNamed(@"") 就可以访问自己 bundle 里的图片了。
这里将前文提到的四个路径做了优先级处理:
1、首先访问的是静态库 + resource_bundles 的路径
2、其次访问的是使用 use_frameworks! + resource_bundles 的动态库路径
3、再次访问的是使用 use_frameworks! + resources 的动态库路径
4、最后是 main bundle 路径
最推荐也是最合理的配置方式当然是第一种,提供静态库,使用 resource_bundles 存储资源文件。
路径 NSBundle
既然图片可以通过这种方式封装,那么参照这种思路将 bundle 封装一个基础方法,有了统一的 bundle 调用方法,其他资源文件的访问就简单的多了。
1 |
|
具体实现为:
1 | + (NSBundle *)holo_bundleNamed:(NSString *)bundleName { |
为了简化调用,提供了宏定义:每个组件调用 HoloCurrentBundle 就可以拿到自己的 bundle 了。
优先级处理和图片的处理逻辑一致。
需要注意的是,如果一个组件拥有多个bundle 的情况,这里只会返回优先级较高的 bundle。
字体 UIFont
APP 中使用自定义字体的场景也比较常见,提供了注册字体的便捷方法。关于注册字体,字体资源文件在主工程的时候是存储在 main bundle 里的,在主工程的 info.plist 文件里注册 key:UIAppFonts,会自动去 main bundle 里注册对应的字体文件。
1 | <key>UIAppFonts</key> |
将字体资源文件拿到组件之后,如果最终资源文件存储在 main bnundle 里的话,以上的 info.plist 里的注册依然可以生效,但如果不在 main bundle 的话就需要通过代码访问资源路径去注册了
1 |
|
具体实现为:
1 | @implementation UIFont (HoloResource) |
为了简化调用,提供了宏定义:调用 HoloRegisterFont(name, extension) 就可以访问自己 bundle 里的字体资源文件注册了。要注意的是,如果字体资源文件所在的组件有多个 bundle 的话,且 字体文件在优先级较低的 bundle 里,使用这个宏就会出问题了。这时可以通过调用 holo_registerFont:withExtension:inBundle: 方法,传入指定 bundle 即可。
本地化语言 Localized
对于本地化语言的资源文件,以下是系统提供的宏定义:
1 |
其中 NSLocalizedStringFromTable(key, tbl, comment) 方法,虽然它也是去 main bundle 里取值,但可以根据 table 划分不同的模块,已经可以解决同名覆盖的问题,但是将这些资源文件拿到 pod 里之后,因为 pod 拥有自己的 bundle,那么这个宏就失效了,所以需要使用下边两个宏定义。前边章节里我们已经等装好了 bundle 统一获取方法,那么这里可以提供一个自定义的宏来简化调用,少传一个 bundle 参数:
1 |
其中, localizedStringForKey:value:table: 方法能够实现本地化的原理只不过是根据不同语言访问不同路径下的本地化文件而已,比如 英语 语言,上述方法访问的就是 ./en.lproj/HoloResourceDemoA.strings:路径下的 .strings 文件
1 | . |
通常工程中有自定义语言的功能,那么可以 hook bundle 的 localizedStringForKey:value:table: 方法,根据自定义的语言标识访问目标文件。
提供 [NSBundle holo_configureLanguage:@"ja"]方法设置当前语言,从而决定访问的目标本地化文件。实现如下:
1 | static NSString *holoLanguage = nil; |
xib 等资源,传递 bundle
其他的资源问题处理方式也都相同,都是根据 bundle 获取到目标文件访问,系统也都提供了根据 bundle 取值的方法,如 UINib:
1 | // If the bundle parameter is nil, the main bundle is used. |
注册 xib 文件:
1 | NSBundle *bundle = [NSBundle holo_bundleNamed:HOLO_POD_NAME]; |
后记
1、代码已开源,具体实现及思路请参照源码:HoloResource
2、大家的资源文件都是怎么管理的呢?欢迎留言讨论指教。